I guess I have some confidence to start the course now, so I will start to write what I think about materials, projects and techniques
Graphite pencil: I bought all the range of pencils and it was good for me. It was interesting to experiment because you can produce extremly fine tonal realistic work.
Good quality pencils are important because a poorly made core can lead to unpredictable tonal range, and, even worse, scratches in the paper.
Uncentered cores tend to break on sharpening. However I use for most my sketches pencils HB, B, 2B and 4B
Graphite stick is good for big work, they are nice to handle, but a little bit messy.
Powder graphite I did not buy, but made it myself. It is nice to use to cover backgrounds.
Charcoal comes in three main types. Willow is light, hard and brittle. It is very messy and powdery and it is very easy rub off from paper.
Vine charcoal is very easy erase.
Compressed charcoal is hard to erase or blend. I have it as sticks and as pencils. Sticks are very good for large area and pencils for adding fine details.
Carbon and charcoal pencils give to you straight black lines, pure black that is hard to get from graphite, but first, before applying to painting, try it for matching with colours on the painting.
Got pastel pencils, but did not got enough experience with them, so hard to say at the moment what I want use them for.
By the way, all artists’ supplies I think are overpriced, luckily for me, I looked at an on-line site for professional artists and, for some reason, drawing materials are not popular in France, so I got most of my stuff with a reduction of 50% and more. So even if I will not use all of these materials for this course, some of them are very good for many another projects, so not a waste of money and it is always good to try and work with new media.
Inks: I bought Indian ink and Chinese ink,but I see there exists a big range or different inks depending on quality, opacity, viscosity, and drying speed. About ink, I noticed that black ink can wash to blue black, brown or grey depending on the pigment that the manufacturer used.
Erasers. I got a kneadable eraser for pencil, charcoal or pastel and it is not just for mistakes you make. I do highlights with it. But I would like to buy a mechanical eraser with different erasers in it for different medias.
I have a pencil eraser and it i very good for adding details to your drawing an making fine highlights.
Sharpenter: I got only one at the moment but want get a fine better mechanical one that can sharpen without breaking fine points.
Paper stumps and tortillons I do not have because they were not mention in the course, but I made one and they are a good blending tool. I understood clearly got from my first try not to blend graphite pencil with fingers. I prefer to keep my hands away from paper. If it is not possible, get a tissue and put under the hand, no matter how you try, hands are greasy. Maybe I would not notice it if I used another type of paper, but this Australian paper that my brother bought me as a present for drawing, shows all touches very well.
No matter what people say, I found out that you need to learn how keep a pencil in the hand. Much more easier work with tools when you know how use them.
Contour Drawing: contour is drawing outline. Contour lines have limitations. If you add more implied lines you will have more clues about the form of objects.
 contour with some colour
Grid drawing for doing an accurate copy. The best way to do it is just to do it. Do it piece by piece; look at negative space and, as I did, by intuition not by measurement. After creating an outline and putting shadows in place, the hard job is done and I can start shadow drawing. Obviously, I did thick squares to learn the technique normally, I will make a light grid and erase it in the finished copy.
PERSPECTIVE
After learning the basics of how to draw with pencils, coloured pencils, pastels, ink, charcoal, sepia and chalk, I would really like now to learn how to use these medias better; I do not believe that there is enough time in life to learn how to draw in each media perfectly and, at this moment, I am confused because I like the possibilities of each media; I just want to draw more and discover something new .
I understood already that the information on the internet is very limited; I need to look for more books to read and look at more paintings of artists that attract my attention. Still, I found learning on the internet very rewarding, because I met interesting teachers and artists who can give you a belief that you can do everything with media if you are confident and patient.
I found it more hard to keep this blog going than draw. It was always my week point. I love to draw and paint, but never did like the parties and bullshit that surrounds art. Possibly, I need a manager to sell my art, I prefer a business person in this direction. Why should I not be only an artist without having to be a good seller myself? Why should I have to meet the right people? What is art? Is it really about paintings, sculptures and drawing, or is it meaningless words that people put around art?
It would be interesting to read about the philosophy of art and art critics, maybe it would clean something for me ....or maybe not.
It would really be interesting for me to return back and redo all the research about artists that I have done to this point after I have studied more.
So back to perspective.
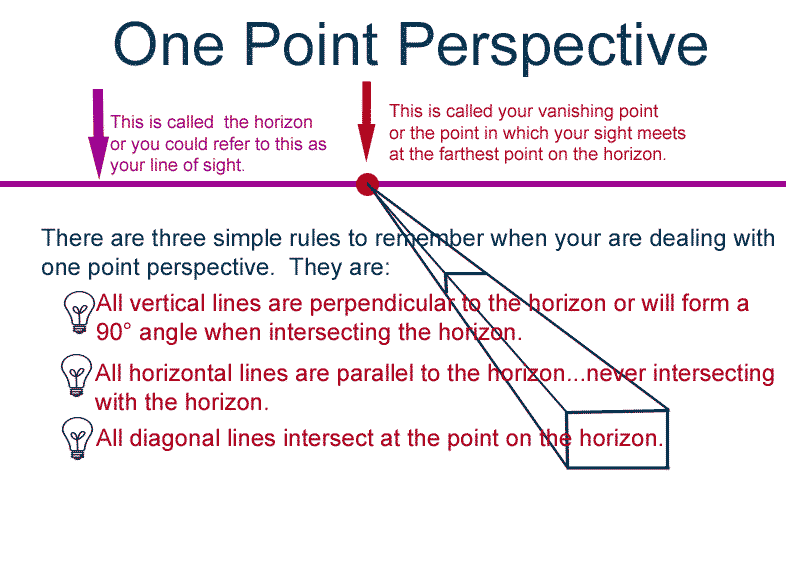
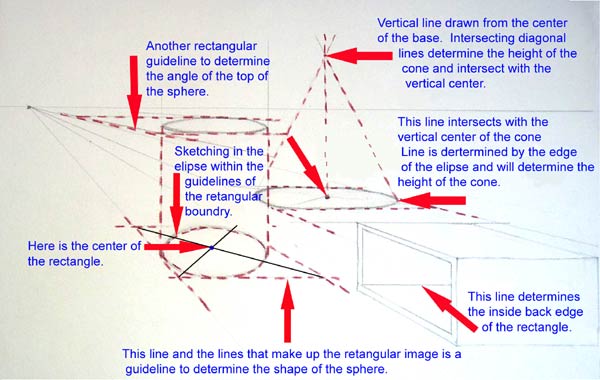
One Point Perspective
Here are several examples of one point perspective in a very simple format. You can play with one point to get the feel for this very ridged method.
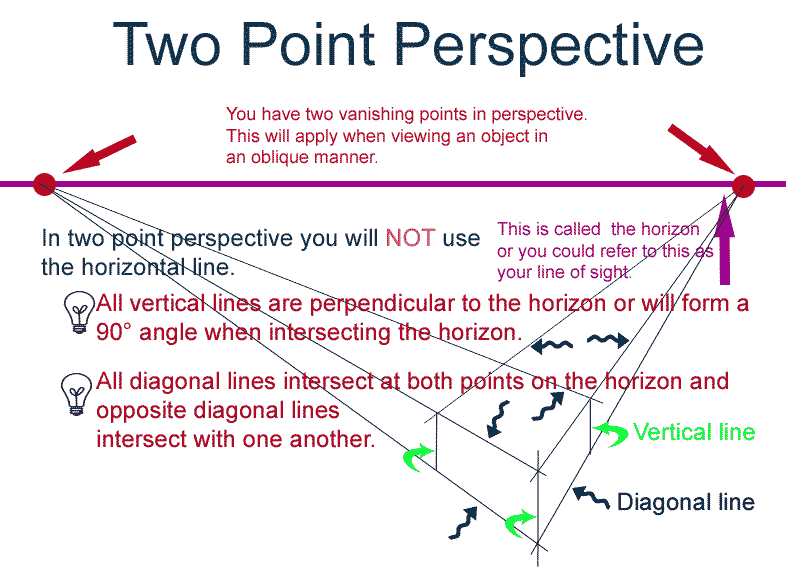
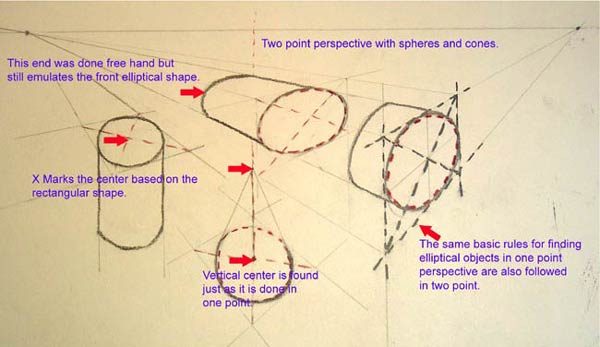
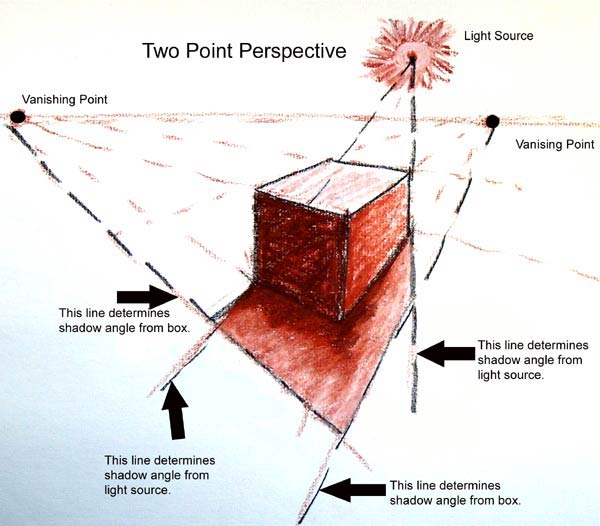
Two Point Perspective
Here is a simple demonstration using shadows for two point perspective
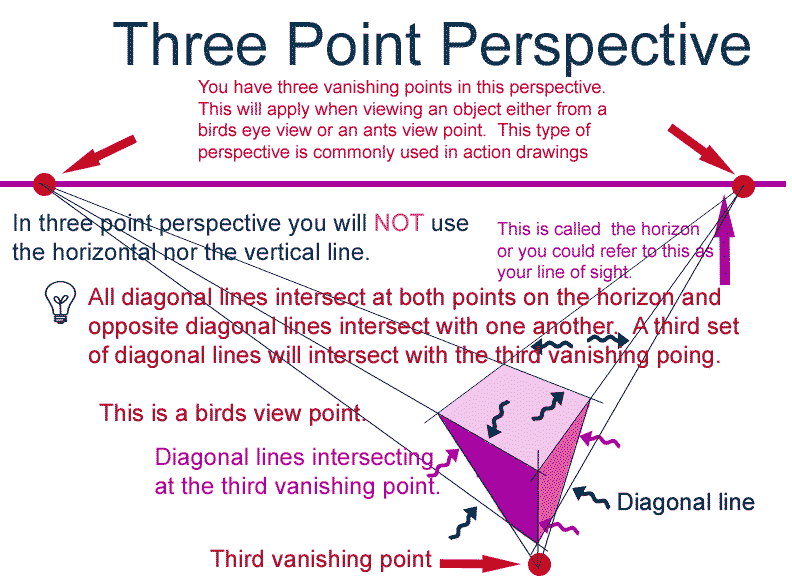
Three Point Perspective
Here is a simple concept for three-point perspective. Keep in mind that when using three point perspective things get a little weird. When working with this concept, objects become very distorted since you do not have the real space to emulate the real world. Therefore, objects seem squished and distorted. This is often used in animation, especially with action comic folks to create drama, action and sense of space in a pretend world. How would you go about showing Superman flying around New York or your own hometown?

http://www.artgraphica.net/free-art-lessons/wetcanvas/basic-perspective-for-artists/basic-perspective-for-artists.htm
| ATMOSPHERIC or AERIAL PERSPECTIVE |

Aerial or atmospheric interference with visual perception causes loss of contrast, detail and sharp focus. The effect, which Leonardo called "the perspective of disappearance," tends to make objects seem to take on a blue-gray middle value as they increase in distance. This effect is used by film makers to give the illusion of great depth, but can be used to great effect by painters and draughtsmen. The illustration above shows loss of color saturation, contrast, and detail as the cubes fall further away from the viewer. Here is a list of attributes that objects have as they recede in space:
- SIZE OF OBJECTS-smaller objects seem farther away (distortions can occur if objects are the same size or too close to the viewer).
- OVERLAPPING OR SUPERIMPOSING-by partially covering one object with another it gives an appearance of depth (distortions also occur if viewer is too close).
- TEXTURE-density increases as an object gets further away.
- SPACING-objects clustered closer together seem farther away. Horizontal lines which get closer as they near the horizon line appear to be defining a recession in space.
- FOCUS-objects lose detail as they recede into space.
- BRIGHTNESS-objects are brighter when closer to the viewer, except for reflective surfaces.
- SHADE AND SHADOW-darker shadows seem closer especially if overlapping other shadows.
- UPWARD ANGULAR LOCATION-creates depth if juxtaposed to ground and sky lines, e.g. tall buildings.
- COLOR-color intensity is much greater closer to the viewer and tends toward medium gray as it recedes.
Hint: As objects recede away from the viewer in atmospheric perspective, bright whites and rich blacks tend toward medium gray and eventually disappear into a blue/gray background. Even colors have greater intensity closer to a viewer than they do further away.
Sometimes an artist describes aerial perspective by allowing the white, or color of the paper to dominate as the depth increases. A good example of this occurs in
Claude Lorraine's Landscape with Ruins, Pastoral Figures, and Trees from between 1643-1655.
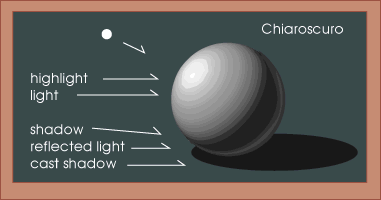
CHIAROSCURO
 |
| //
// |
Chiaroscuro is a method for applying value to a two-dimensional piece of artwork to create the illusion of a three-dimensional solid form. This way of working was devised during the Italian Renaissance and was used by artists such as Leonardo da Vinci and Raphael. In this system, if light is coming in from one predetermined direction, then light and shadow will conform to a set of rules. A hightlight will mark the point where the light is being reflected most directly. This is most often bright white, although in my illustration it is 10% Black. As one's eye moves away from this highlight, light hits the object less directly and therefore registers a darker value of gray. In my illustration there is a regular transition until you reach the point where the shadowed area of the form meets the lighted side.
Here there is a more sudden transition to darker values because no light is hitting that side. Some indirect light is available because the dark side does not turn solid black. This is the result of reflected and refracted light that naturally occurs. As you look at the extreme edge of the form, you will notice that it is markedly lighter than the shadowed area of the object. Light in the environment is illuminating the back edge.
The cast shadows are usually divided up into separate values as well. The area closest to the object is usually the darkest area that is being portrayed. Then, as light becomes more available, the same cast shadow lightens in increments until it reaches the shadow's edge.
Hint: Often times a drawing does not have this exact transition of grays. One can control and manipulate this formula to create interesting moods and character in a piece of work. A High Key drawing is one that has mostly light values, probably with no value of more than 60% at the darkest points. A Low Key drawing would be one that has mostly dark values. In both Low and High Key pieces this system of chiaroscura can be used to create the illusion of three-dimensional space in a drawing.
Hint: How to create shadows in linear perspective.
TEXTURAL CHANGES AND RELATIVE VALUE
 |
| //
// |
Value and contrast are often dependent upon the texture of the the object being rendered. In the diagram above, you can see that the sphere on the left, although adhering to the characteristics of chiaroscuro, does not seem to have a graduated change in value. This is caused because the texture of the sphere is somewhat like that of a wound ball of string and there are additional values breaking across the surface. These lines help to create value and by overlapping the lines one can create lighter and darker value gradations (hatching and cross-hatching). The cube in the center has a pattern which appears to darken on the top plane. What is actually happening is that the background behind the pattern has lightened, creating the illusion of darker spots.
The cylinder at the far right has a slick reflective surface. In such a surface there is a broad value range, usually from bright white to black. The transitions between these extreme values is usually more sudden than on a matte or heavily textured surface. You will find that reflective surfaces placed in compositions with heavily textured objects will create interesting contrasts that compliment each other.
Hint: When dealing with texture, remember that heavily textured items will have slow gradual changes in value unless the plane ends abruptly. In contrast reflective surfaces will have sudden changes in value, from one extreme to another, with only slight changes in the direction of the planes.
Hint: More information on reflections can be viewed at Reflections in Round Objects.
REFLECTIONS IN ROUND OBJECTS
This particular page was done in response to Andrea Seri, an illustrator in Italy. He was interested in how reflections occur in round objects.
In this illustration, the reflected forms correspond to the shape of the reflective object. You will notice that as the shape of the object changes, the more skewed the reflection becomes. A reflection also picks up bits of information that we do not see from our vantage point, i.e. the shadow of the center cone. A true reflection will also show the observer (artist) on the side closest. Although it is not illustrated here, the reflected color of an object is also a bit less saturated. Its intensity dimishes.
This is a simple illustration. I recommend observation of a highly reflective object in conjunction with this diagram.
COMPOSITIONAL MODELS 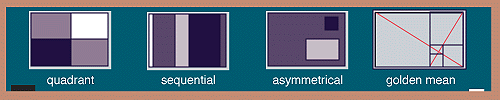 A good basic composition will often either be asymetrical or will lead the viewer's eye around the work. Some standard compositional layouts are shown above. A good basic composition will often either be asymetrical or will lead the viewer's eye around the work. Some standard compositional layouts are shown above.
- Quadrant-In this simple composition a dynamic balance is created by the changes in value from dark to light. There is not equal amounts of dark or light on each side.
- Sequential-This simple composition is completely reliant on rhythms. Rhythm is important to all compositions in any discipline and visual art is no exception. The changing sizes and values lead a viewer across the page like changing notes lead a listener through a piece of music. Notice that there are not any two areas that are the same size. This helps to create an asymmetrical balance. Other types of sequential compositions rely on mathematics, like the Fibonacci Sequence.
- Asymmetrical-Also referred to as Dynamic Balance. This sort of composition relies on creating balance between the two sides of the picture. In this picture the negative space, or area on the left where there is no rectangular object, has equal visual weight to the right side. Think of it as you would a scale. On one side of the scale there is eight one-ounce cubes and on the other is two four-ounce cubes. They both weigh eight ounces, but look different. In a compositon this could be shown as two large dark squares and eight light squares. Try to move the elements around the compositon to lead the viewer around the composition. The use of one shape, color, line etc. is called repetition of an element and helps to create connections between objects in a composition. This compositional style also shows up in sculpture.
- Golden Mean (or Fibonacci Sequence used in a spiral)-This mathematical composition is created from a 1 to 1.618... ratio. You will find this particular ratio works well in creating an interesting balance in a picture. The system is made up of a series of square areas which diminish in size and curve in toward the center, much like a snail's shell. One can recreate a similar instance of this by starting with a 10 inch by 16 inch rectangle. Divide a square section on the left side with a vertical line. Draw a line from corner to corner. At the point that the diagonal meets the vertical line draw in a horizontal. Draw another diagonal from the top right corner to the bottom of the vertical line. Draw a vertical from the point where the diagonal meets the horizontal line and continue the process until the squares become too small to work with.
Most compositions do not adhere only to one of these models, but use a combination of two or three to help carry a viewer through more complex pathways.
Hint: Look at other artist's compositions. You will notice that Repetition of an Element occurs as a way of holding the composition together. One may see a small hint of orange on one side of a painting that is there to balance and compliment a larger area on the other side. A curved or straight line that is reproduced in different sizes, thicknesses, and places throughout a work can visually hold the piece together.
THE FIBONACCI SEQUENCE FOR VISUAL LAYOUT  The Fibonacci Sequence is a numerical convention that can be translated into many forms. It has been used in mathematics, architecture, poetry, music, art, and even as a system for predicting the growth of the stock market. It was developed by man named Leonardo of Pisa. Leonardo called himself Fibonacci which is a derivation from a Latin phrase "filius Bonacci" or "son of Bonacci." Even though he was originally from Italy, Fibonacci was educated in Bougia, North Africa and learned the "Hindu-Arabic" mathematical system from Moorish teachers. He saw advantages to this system and was one of the individuals responsible for introducing it into Europe. The Fibonacci Sequence is a numerical convention that can be translated into many forms. It has been used in mathematics, architecture, poetry, music, art, and even as a system for predicting the growth of the stock market. It was developed by man named Leonardo of Pisa. Leonardo called himself Fibonacci which is a derivation from a Latin phrase "filius Bonacci" or "son of Bonacci." Even though he was originally from Italy, Fibonacci was educated in Bougia, North Africa and learned the "Hindu-Arabic" mathematical system from Moorish teachers. He saw advantages to this system and was one of the individuals responsible for introducing it into Europe.
The system, when applied to a composition can dictate placement of elements in the artwork. This results in elements that have a sort of 1/3 to 2/3 ratio making the composition more interesting. The true ratio is actually 1:1.618034. This is also called the Golden Mean and was used by the Ancient Greeks in the design of their architecture.
The composition that I have illustrated above, shows the Sequence applied in a spiral pattern. Starting with 1 x 1 square (yellow), above a 1 x 1 square (white), then bounded by a 2 x 2 square, then a 3 x 3 square, a 5 x 5 square, etc... spiraling outward from center. The abstracted figure is applied to composition. The system can also be used by dividing a rectangle by the Sequence's inverse, or .618034. This ends up being something akin to the 1/3 to 2/3 ration which I mentioned above.
Artists who used the Fibonacci Sequence in their works include Leonardo da Vinci, Albrecht Durer, Piet Mondrian, and Michelangelo. If you dissect a work like Perugino's Madonna Enthroned with Child and the Saints John the Baptist and Sebastian , you will notice that the saints are set into rectangles which reflect a .618034 ratio of the total width of the work, measuring from each side inward.
Hint: When designing a drawing, divide up the paper into sections based on this principle, then place your subjects into these divisions. Don't follow the lines so exactly that they are evident, but allow for some natural flow to extend beyond the boundaries that you have drawn. You'll find this effective in making your drawings more interesting.
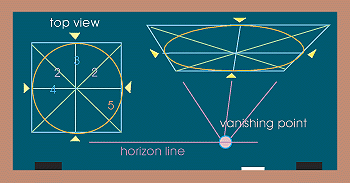
INTRODUCTION TO LINEAR PERSPECTIVE 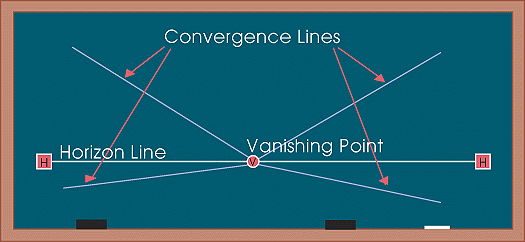 Here is a basic layout that illustrates how lines recede in one point perspective. Here is a basic layout that illustrates how lines recede in one point perspective.
Horizon line-is always at eye level. Picture yourself at the seashore and looking out at the ocean you notice that the water meets the sky at your eye level. This never changes. You may be in an airplane 1000 feet up and the level that the ocean meets the sky is still at your eye level! Or you may be lying down on the beach and the ocean level drops with you. Think of it as an invisible plane that cuts through everything, that always exists at eye level.
Hint: Your horizon line always falls at eye level regardless of where you're looking. For instance, if you are looking down, your eye level remains at the height of your eyes, not down where you are looking.
Vanishing Point-is the point to which all lines which are parallel to the viewer recede. You may want to think of the last time you were looking down a long stretch of straight highway. The edges of that highway appear to move at an angle upward until they meet the horizon. In one point perspective all verticals and horizontals stay the same and only lines that are moving away from or toward the viewer seem to recede on the horizon at the vanishing point.
Hint: All planes must be perpendicular or parallel to you in order for this system to work correctly. If you are looking at the corner of an object that is not at a 90 degree angle to you this will create distortions!
Convergence Lines (also called orthagonals)-are lines that converge at the vanishing point. These are any lines that are moving away from the viewer at an angle parallel to the direction that the viewer is looking. In the case of the highway that we mentioned above these lines would be the edges of the highway as they move away from you forward into the distance.
- Try drawing a straight highway or railroad tracks using horizon lines, vanishing points, and convergence lines.
An example of convergence lines as they recede can be found in Giovanni Battista Piranesi's, Fantasy on a Magnificent Triumphal Arch, from 1765. If you look carefully at the side of the building, you will notice that the bricks and other diagonals on the triumphal arch are a series of convergence lines that change in relation to the horizon line. The line that is closest to the horizon line will be almost flat and lines higher up will have a greater angle downward as they get further away from the horizon line. You can see where Piranesi has left some of his convergences go beyond the building directed toward the vanishing point.

Giovanni Battista Piranesi
Fantasy on a Magnificent Triumphal Artch, 1765
Ailsa Mellon Bruce Fund
1986.32.1
EXTERIORS IN 1-POINT PERSPECTIVE 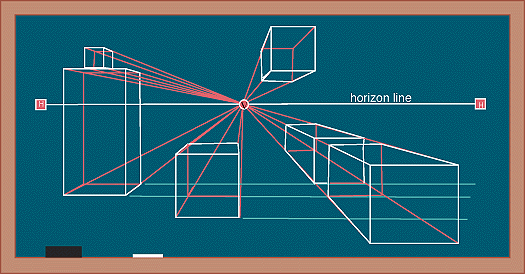
Convergence Lines are in red, as well as, construction lines of those areas that are obscured from view.
In the diagram above, you will notice that all the diagonals recede to the central vanishing point. In one point perspective all horizontals and verticals do not change. Objects that are above the viewer's horizon line are viewed from underneath (they are above your vision). Objects that are below the viewer's horizon line are viewed with their tops showing. Any object that straddles the horizon line, like the large object on the left, does not show top or bottom because these are obscured from the viewer. Remember that this system will only work if you are parallel and perpendicular (90 degree angles) to the objects that you are drawing.
Hint: If an object is directly in front of the vanishing point, only the front is visible and all sides are obscured.
Hint: Notice the light green lines that run horizontally along the bottoms of the objects at the bottom of the page. By using these lines, one can find approximate placements for other objects. The two objects in the lower right hand corner are not only lined up as they recede to the vanishing point, they are also lined up along their respective front and back edges. If you have two or more objects that share a common horizontal (or vertical) you can align them easily by finding points and edges in common.
If you examine Vermeer's Little Street, you will notice that all the diagonal lines appear to recede to a point within a window on the second floor of the building in the center of the painting. This indicates that the artist's eye level was also above street level. Probably looking out a second floor window across the street. Look at how the chimnies on the left hand side of the painting all line up to create a diagonal which leads to the vanishing point. Even the cobblestones in the street adhere to this rule.

INTERIORS IN 1-POINT PERSPECTIVE 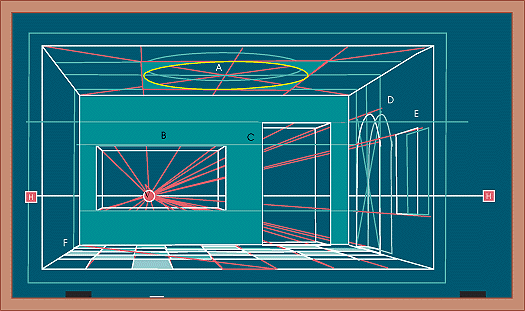
The vanishing points and horizon line are often obscured when observing interior spaces. It is important to remember that one's eye level is the horizon line. In an interior space, it would be an imaginary horizontal plane at eye level that cuts through everything. You could make a mark on the wall, while standing next to it, at eye level and this would carry throughout the room and on into infinity. The following are short explanations of the above diagram:
A. There is a large circular window in the ceiling of this interior. One can plot the center and placement of such an element by first finding the middle. This can be done by running a large x through the space from corner to corner. The point where the lines intersect will be the middle (remember that spaces get smaller as they recede, so the back of the space will be smaller than the front in perspective). If you know the approximate dimensions of the circle you can find the extreme edges of the circle by placing two horizontals and two verticals in the space (they will intersect on the x lines, that's where they will change directions). You can then find the extreme points of your circle on the centers of the flat sides. By connecting these four points with a parabolic curve, you can create a convincing centered circle on any plane that is receding.
B. The large window in the rear wall opens on the vanishing point and horizon line. If you look carefully at the corners of the window you will notice that inside of the window there are planes that recede to the vanishing point. The corners have angles that lead to the vanishing point because these are planes that are receding away from the viewer.
C. There is also a doorway in the back wall which has similar properties to the window. You can see more of the underside at the top of the doorway because it is higher or further from the horizon line. As planes get further away from the vanishing point and horizon line you can see more of them.
D. The arched doorway on the right side wall is just as tall as the doorway in the back wall. You will notice that a light green line is drawn to indicate the height of the doorway in the back wall. If you follow this line until it intersects with the right side wall you will notice that one of the red convergence lines also meets here, then continues on along the right wall. Because objects on the right wall are getting larger as they come closer to the viewer, the line on the back wall is the same height as the red line on the side wall. The arch way is done just like the ceiling circle, but halved and placed on top of two verticals.
E. The window in the right side wall is the same height as the window in the back wall. There are also light green construction lines that indicate height and meet the red convergence lines.
F. Tiled floors are a good example of how things get larger as they move further away from the vanishing point and horizon line. The best way to make a convincing tile floor is start by approximating or plotting the dimensions of just one square tile at any corner of the floor. Delineate the entire back wall by using equal distances along a horizontal path. Through each of the delineations run a convergence line from the vanishing point through the point and well beyond. This will give you a series of lines on the floor running back to the vanishing point. Using the first tile that you drew, run a diagonal from corner to corner within that tile and extend that line out beyond the edge (like the red line on the diagram). At each point that the red line intersects with the convergence lines you will draw a horizontal line that intersects at the same point. This will give you a tile floor if you continue this process.
A good example of perspective used in an interior space occurs in Raphael's School of Athens. In this example, one can see that the convergence lines that create the architecture converge at the two central standing figures in the background.

PLOTTING A PERFECT SQUARE IN 1-POINT PERSPECTIVE
 | Much of the creation of spaces in linear perspective relies on the establishment of a basic unit-the square. A square can be the basis for the construction of a grid, circular forms, and the establishment of inclines. This diagram illustrates a reliable method for approximating a view of a square drawn in linear perspective. Here is the method for creating a square in one-point perspective: |
| //
// |
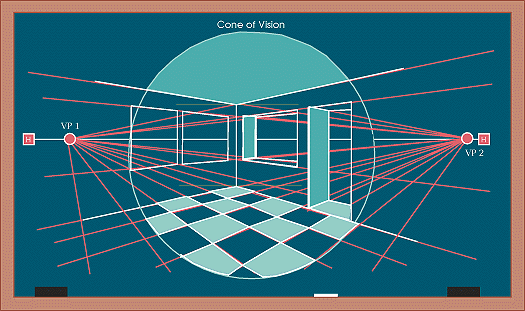
- In order to faithfully reproduce anything in linear perspective it is important to establish a cone of vision. We have done this in the diagram by creating a perfect circle whose center is the vanishing point. A larger cone of vision works better and helps to eliminate distortions.
- We should also establish a vertical axis. This axis will help us to establish placement of the perspective square in the space.
- Next we can place a square somewhere adjacent to the circle of vision. It can be placed anywhere, but its placement will dictate where the perspective square will fall. If the square is close to the horizon line, then the perspective square will be smaller and further back in the space. If further from the horizon line, then it will be larger and closer to the viewer. It should always be inside or at least touching the cone of vision. If it is placed below the horizon, the perspective square will be drawn above and vice versa.
- Now draw lines from each of the four corners of the square (marked A, B, C, and D in the diagram) to either top or bottom of the axis line where it intersects the cone of vision. The establishment of the point will depend on whether your square is placed above or below the horizon line. Remember that the drawn square will be drawn in the opposite semi-circle.
- At the points where A, B, C, and D intersect the horizon line, lines will be drawn vertially or perpendicular to the horizon line. This is illustrated with four red lines that drop vertically from those four intersections.
- Now the square will begin taking shape when you draw two diagonals from the points on the cone of vision where they intersect with the horizon line. These two points are on the right and left of the vanishing point toward the far end of the horizon line. They are marked in green. At the points where these diagonals intersect the verticals (marked with yellow dots) you will establish the perspective square.
- Points A and C represent the back edge of the square (they are further from the horizon line) and B and D represent the front.
This should establish a convincing square that appears to recede into space. To check your work, make sure that the diagonal lines which emanate from the edges of the cone of vision intersect the corners of the square. Also check to make sure that the right and left edges recede back to the vanishing point. You can also check a square that you have approximated by reversing this process. I also recommend good observation of a real space to compliment this process.
I would like to thank Ward Walker, Jr. of Austin Community College for his question about creating a square in perspective.
DRAWING A CIRCLE IN 1-POINT PERSPECTIVE
 | To draw a circle using linear perspective, it is best to start with a square. The diagram shows a top view and a perspective view of a circle drawn in one-point perspective. After you have established a horizon line, then create a square that bounds the edges of the circle that you wish to create. Follow this step by step procedure to make convincing cirlces in perspective: |
| |
- Begin by creating a square in perspective. Look carefully to make sure that the form that you are creating in perspective is a square and not an elongated rectangle. Both right and left edges should recede back to the vanishing point on the horizon line.
- Subdivide the square by drawing a line fron corner to corner, then repeat this process with the opposite two corners. The point where the diagonal lines intersect will be the center of the square in perspective. The center should appear to be closer to the back edge than the front because size diminishes as things get further away from the viewer.
- Draw a line from the vanishing point through the center point until it reaches the back of the square. This will subdivide the square into halves.
- Draw a horizontal line through the center point which intersects the sides of the square. This subdivides the square further.
- Using the points where the subdivision lines meet the edges of the square, draw an oval whose furthest extensions are at the center of each flat side of the square. This oval will be somewhat smaller at the back of the square. Allow your drawing lines to create a flow, as if the line does not stop at each point, but continues unimpeded.
For best results, combine this process with observation of a circle in perspective.
A good example of circles in perspective occurs in the work of Giorgio di Chirico's Uncertainty of the Poet from 1913. The tops of the doorways on the right are lined up along a convergence line. The doorways are good examples of semi-circles drawn in perspective.
 |
| © DACS, 2002 |
The Uncertainty of the Poet 1913 DRAWING GRIDS IN 1-POINT PERSPECTIVE 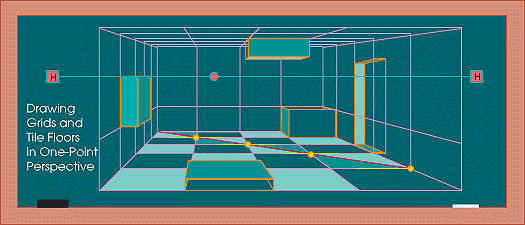 To draw grids using linear perspective, it is best to start with a square. The diagram above shows a perspective view of a room drawn in one-point perspective. After you have established a horizon line and a vanishing point follow this step by step procedure to create a gridded floor pattern: To draw grids using linear perspective, it is best to start with a square. The diagram above shows a perspective view of a room drawn in one-point perspective. After you have established a horizon line and a vanishing point follow this step by step procedure to create a gridded floor pattern:
- Begin by creating a square plane in perspective. Remember that when drawing objects in perspective one must trust observed forms as models. You will find that when you look at a square in perspective it appears to be a very flat form in space.
- Make marks at equal increments across the back edge of the square. You can use a ruler to mark off 1" increments or any regular measurement that you choose (my diagram uses 40 points for each segment, which is approximately 40/100ths of an inch).
- Draw a line from the vanishing point through each point until it reaches the back of the square. Notice that the points where the lines meet the front edge of the square are further apart than the points at the back edge.
- Draw a horizontal line across these lines indicating a row of tiles along the back edge of the square space that we are subdividing. Double check to be sure that you compare this placement to observed square spaces in perspective, the way we did in step 1.
- Using the top left corner of the space as a staring point, draw a line from the top left corner through the bottom right corner of the small square in that corner of the drawing and continue out until it reaches the side of the square. This line will meet at the front right corner of the large square if it is a perfect square.
- Draw a horizontal line at each point that the diagonal crosses the radiating lines that subdivide the large square. This will create a grid pattern.
This grid system can be carried into walls and ceiling areas to create grids on all planes. This may make it possible to systematically place objects in a space by using the grid on all planes.
An example of a gridded floor that is done in this manner is Botticelli's The Annunciation of 1489. By clicking on the smaller image you can inspect this floor in greater detail.
CALCULATING DIMINISHING SIZE IN PERSPECTIVE 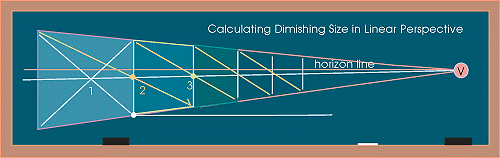 Here is a formula for showing diminishing sizes of planes in a convincing way. Always establish a horizon line and vanishing point before starting. Here is a formula for showing diminishing sizes of planes in a convincing way. Always establish a horizon line and vanishing point before starting.
- Establish a square or rectangular plane in perspective near the foreground in your drawing. Subdivide this plane by drawing a line from corner to corner, then repeat the process with the opposite two corners. The point where the diagonal lines intersect will be the center of the plane in perspective. From this center point draw a line back to the vanishing point (marked with a "V" in the diagram) to establish a receding horizontal center line.
- Draw a line from the top left corner of your plane through a point where the vertical line that creates the back of the plane meets the horizontal center line (this point is marked with a yellow dot in the diagram) and continue this line until it intersects the bottom convergence line.
- At this point, where the convergence line meets the (yellow) construction line, draw a vertical and this becomes the back edge of the next plane adjacent to the previously established one.
- Repeat steps 1, 2, and 3 as many times as needed to continue diminishing size.
One can also plot diminishing size on horizontal adjacent planes by using the top or bottom edge of each vertical plane. The horizontal white line near the bottom of the diagram is merely a horizontal line that intersects with one of the vertical divisions. From these points one can plot the dimishing size of the horizontal planes.
Diminishing size in perspective is shown in Pieter Brueghel the Elder's Peasant Dance done around 1567. You can see the size of areas in the front of the building on the left, then in the picket fence. Since this will appear as a large image in your browser window, you can scroll through the piece to find other specific details.

EXTERIORS IN 2-POINT PERSPECTIVE 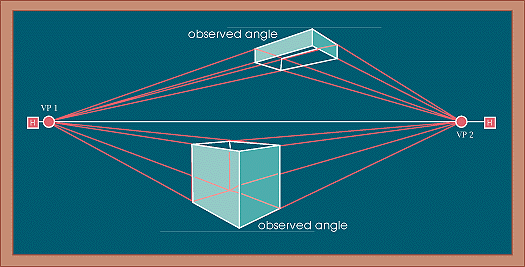
When using two point linear perspective, one must look carefully at the placement of the object. If the object is not perpendicular and parallel to you and you are looking at it's corner, then you probably want to work in two point. Sometimes when working in two point perspective one of the vanishing points is not on the page. You then must approximate where the point falls by looking at the angles of the object which you are drawing. The best way to approximate an angle and find a vanishing point in two point perspective is to first find your horizon line. This is a level line. By using this level and placing it next to the front corner of the object one can then see the angle and continue this angle out until it intersects with the horizon line. After you have found this intersection, then you have established your vanishing point for all the planes that are parallel and recede the same direction. Repeat this process for the other side of your object and all convergence lines will be established. Use the font edge of an object in two point perspective when you want to scale it. This is the only constant line in two point because there are no horizontals on the object to work from. Verticals are always at a 90 degree angle to the horizon line in one and two point perspective.
Hint: Find your horizon line first. Then find out how much distance in proportion to the object's height there is between the horizon line and the front vertical edge of the object. This will help eliminate distortions.
NTERIORS IN 2-POINT PERSPECTIVE
 When working in two point perspective in an interior space, the horizon line and other construction lines are often obscured. One must remember that the convergence lines that create the side walls are crossing over one another and recede to the vanishing point on the opposite side of the page. The best way to start drawing an interior space in two point is to first put in the vertical line of the back corner as it relates to the horizon line. You can tell how much of the vertical line in the corner falls below and above the horizon line by noting where your eye level is in relation to it. When you have made this proportionally correct, then you can find the angles by comparing to a horizontal (see Linear Perspective-Exteriors (two point)) and extending the angled line from the top or bottom of the vertical until it meets the horizon line. This is a vanishing point for all parallel planes. Go through the same process with the other wall. All planes that are parallel will recede to the same vanishing point. Divisions in the floor are best approximated, then carry convergence lines back to their respective vanishing points. Hint: Remember that you are working within a cone of vision. Adjust your drawing so that all of the information is within this cone, otherwise you will have some distorted areas. When working in two point perspective in an interior space, the horizon line and other construction lines are often obscured. One must remember that the convergence lines that create the side walls are crossing over one another and recede to the vanishing point on the opposite side of the page. The best way to start drawing an interior space in two point is to first put in the vertical line of the back corner as it relates to the horizon line. You can tell how much of the vertical line in the corner falls below and above the horizon line by noting where your eye level is in relation to it. When you have made this proportionally correct, then you can find the angles by comparing to a horizontal (see Linear Perspective-Exteriors (two point)) and extending the angled line from the top or bottom of the vertical until it meets the horizon line. This is a vanishing point for all parallel planes. Go through the same process with the other wall. All planes that are parallel will recede to the same vanishing point. Divisions in the floor are best approximated, then carry convergence lines back to their respective vanishing points. Hint: Remember that you are working within a cone of vision. Adjust your drawing so that all of the information is within this cone, otherwise you will have some distorted areas.
INCLINES AND DECLINES IN PERSPECTIVE 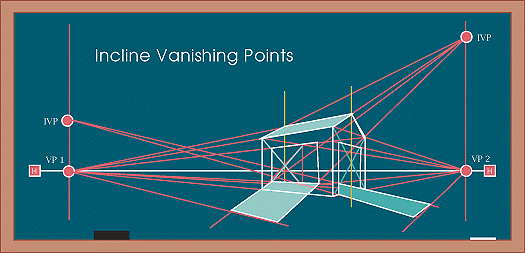 It is important to remember that all planes that recede in perspective meet at a vanishing point that corresponds to the horizon line. In the case of inclines and declines this is also true. Incline vanishing points and decline vanishing points correspond to a vanishing point on the horizon line. They are placed directly above or below the related vanishing point on the horizon line. Again, the best way to find the incline vanishing point. Use a horizontal and approximate the angle, then continue the line until it intersects with a vertical line above (or below) the vanishing point on the horizon line. Your incline (or decline) vanishing point will be at this intersection. It is important to remember that all planes that recede in perspective meet at a vanishing point that corresponds to the horizon line. In the case of inclines and declines this is also true. Incline vanishing points and decline vanishing points correspond to a vanishing point on the horizon line. They are placed directly above or below the related vanishing point on the horizon line. Again, the best way to find the incline vanishing point. Use a horizontal and approximate the angle, then continue the line until it intersects with a vertical line above (or below) the vanishing point on the horizon line. Your incline (or decline) vanishing point will be at this intersection.
Hint: To find the center of a roof pitch, draw an x from corner to corner, then place a vertical line through the central intersection. Your incline convergence lines will intersect with this line at the peak of the roof.
Hint: Check to see if you are drawing an incline or a decline. All decline vanishing points are below the horizon line. Often times when you are looking at an incline from underneath (like a cathedral ceiling) you are looking at a decline. Roads moving up or downhill and steps can be plotted using incline/decline vanishing points.
THE PERSPECTIVE OF SHADOWS  Even shadows have vanishing points, but these may not correspond directly to the standard construction vanishing points or horizon line. Shadows have their own vanishing points which are called light vanishing points or shadow vanishing points. To create believable shadows one must first draw an object in a transparent way. This is because you will need to know where the back corners are in order to finish a shadow which may disappear behind the object. Then you find the light source in relation to the object. You may want to check to make sure that you are placing it in the proper position, otherwise there will be distortions. You then create a vertical line descending directly from the light source or light vanishing point until it intersects with the surface where the shadow is being cast. This point will be your shadow vanishing point and shadows will radiate out from this point. Send light convergence lines through all top corners of the object (some may end up inside your object). Then send shadow convergence lines through all the corresponding bottom corners until they intersect with the light lines. This will mark the extreme edges of your shadow. Even shadows have vanishing points, but these may not correspond directly to the standard construction vanishing points or horizon line. Shadows have their own vanishing points which are called light vanishing points or shadow vanishing points. To create believable shadows one must first draw an object in a transparent way. This is because you will need to know where the back corners are in order to finish a shadow which may disappear behind the object. Then you find the light source in relation to the object. You may want to check to make sure that you are placing it in the proper position, otherwise there will be distortions. You then create a vertical line descending directly from the light source or light vanishing point until it intersects with the surface where the shadow is being cast. This point will be your shadow vanishing point and shadows will radiate out from this point. Send light convergence lines through all top corners of the object (some may end up inside your object). Then send shadow convergence lines through all the corresponding bottom corners until they intersect with the light lines. This will mark the extreme edges of your shadow.
Hint: Light radiates out in all directions. If you have a light source directly above an object, then your object will cast shadows in all directions.
Hint: Shadows can be cast on a number of surfaces. For instance, if you have an object sitting on a table, then there will be a different shadow vanishing point for the object (which will be on the tabletop) and for the table (which is on the floor).
Hint: When the light source is the SUN or MOON, the shadow vanishing point is on the horizon directly below the light source.
3-POINT PERSPECTIVE 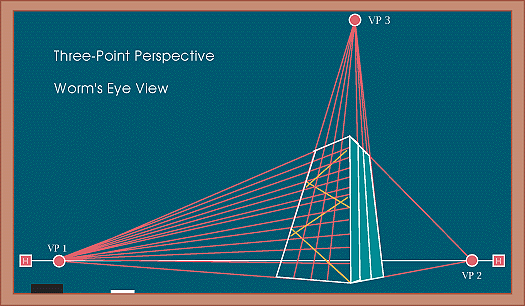
A third point can come into play in perspective, but only when dealing with extreme heights or lows. Tall buildings are one example. In the case of looking up at a tall building (worm's eye view) the edges of the building will not only recede to the two vanishing points (if looking at corner), but there will be an upward (or downward) recession to a vanishing point. This vanishing point is always directly in front of the viewer at a 90 degree angle to the horizon line. If looking down at an object in three point perspective it is referred to as a bird's eye view.
M.C. Escher uses three-point perspective in the piece Ascending and Descending. In this picture, all the convergence lines (see Linear Perspective: Introduction in Art Studio Chalkboard) recede to vanishing points at the left, right and also below. Even though this is similar to a two-point perspective exterior, he is using the third vanishing point to allow the viewer to perceive the vertical depth. You will notice that all 90 degree angles recede to one of these three vanishing points. This bird's eye view allows one to see planes receding back in three directions.

http://studiochalkboard.evansville.edu/lp-ex3.html
http://www.artscroll.ru/page.php?id=3292 |
|
|
|


No comments:
Post a Comment